Hands-On DevOps: Provisioning a Multi-Tier Web Application (Manual vs. Automated)

Hands-On DevOps: Provisioning a Multi-Tier Web Application (Manual vs. Automated)
Modern software applications rarely run on a single server. As applications grow in complexity and user traffic increases, separating services into dedicated layers becomes essential for performance, scalability, maintainability, and security.
To understand how enterprise infrastructure is designed and managed, I deployed VProfile, a Java-based multi-tier web application, on multiple Virtual Machines (VMs). Instead of jumping directly into automation, I first provisioned every service manually to understand how each component communicates within the infrastructure. After successfully building the environment, I automated the entire deployment using Vagrant and shell provisioning scripts.
This project helped bridge the gap between traditional system administration and modern DevOps practices by demonstrating how Infrastructure as Code (IaC) transforms complex deployments into repeatable, reliable workflows.
Why Multi-Tier Architecture?
Running every component on a single server may work for small projects, but it quickly becomes difficult to maintain as traffic grows.
A multi-tier architecture separates responsibilities into independent services:
- Better scalability
- Improved fault isolation
- Higher security
- Easier maintenance
- Independent service upgrades
- Production-ready deployment strategy
Instead of having one machine performing every task, each service is dedicated to a specific responsibility.
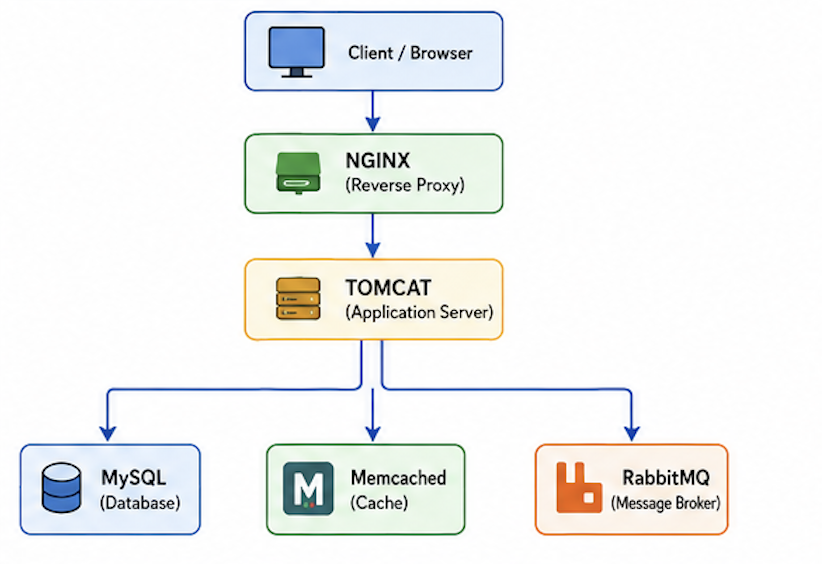
System Architecture
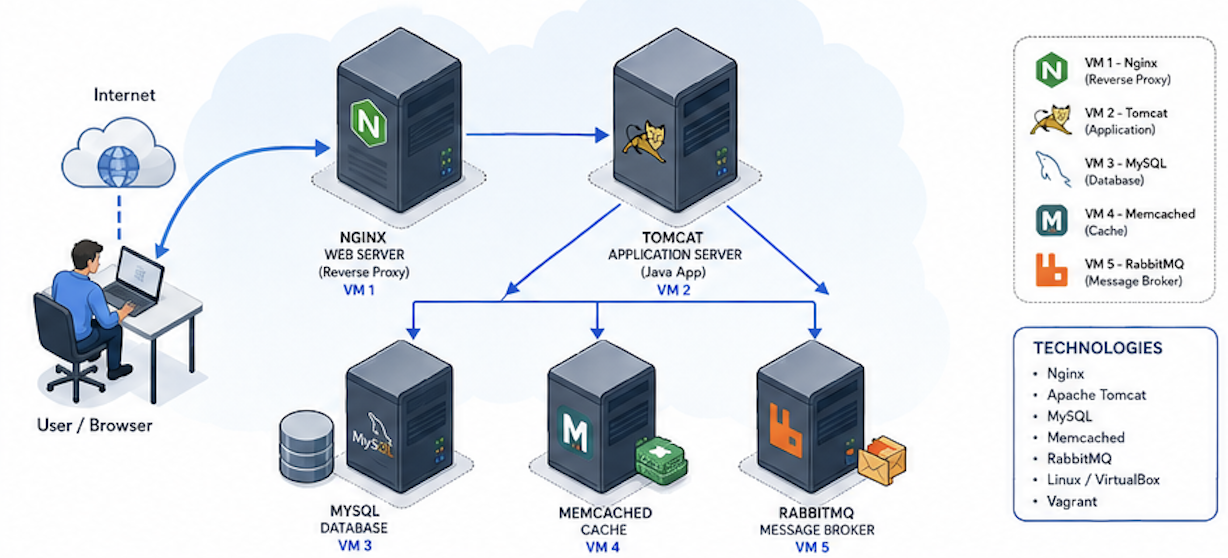
The deployed VProfile infrastructure consists of five independent servers working together.
Suggested Cover/Architecture Image
Generate a clean isometric DevOps architecture diagram showing:
- Client Browser
- Nginx Reverse Proxy
- Apache Tomcat
- MySQL
- Memcached
- RabbitMQ
- Five Linux Virtual Machines
- Blue network connections
- Modern cloud/enterprise design
- White background
- Flat vector style
Technology Stack
| Component | Purpose |
|---|---|
| VirtualBox | Virtualization Platform |
| Vagrant | VM Provisioning |
| Nginx | Reverse Proxy |
| Apache Tomcat | Application Server |
| Java | Backend Application |
| MySQL / MariaDB | Database |
| Memcached | In-memory Cache |
| RabbitMQ | Message Broker |
| Bash | Automation Scripts |
| Linux | Operating System |
Understanding Each Component
1. Nginx
Nginx acts as the entry point for every incoming request.
Responsibilities include:
- Receiving HTTP requests
- Reverse proxying
- SSL termination
- Serving static assets
- Load balancing (in production)
Instead of users communicating directly with Tomcat, every request flows through Nginx.
2. Apache Tomcat
Tomcat hosts the Java web application.
It is responsible for:
- Processing user requests
- Executing business logic
- Database communication
- Cache access
- Sending messages to RabbitMQ
This is where the application actually runs.
3. MySQL
MySQL serves as the application’s persistent storage.
It stores:
- User information
- Login credentials
- Application data
- Business records
Unlike Memcached, data stored here remains permanent.
4. Memcached
Memcached significantly improves application performance.
Instead of repeatedly querying MySQL for identical data, frequently accessed information is cached in memory.
Benefits include:
- Faster responses
- Reduced database load
- Lower latency
- Better scalability
5. RabbitMQ
RabbitMQ handles asynchronous communication.
Rather than making users wait for background operations, tasks are placed into a message queue.
Examples include:
- Sending emails
- Notification processing
- Background jobs
- Log processing
This keeps the application responsive.
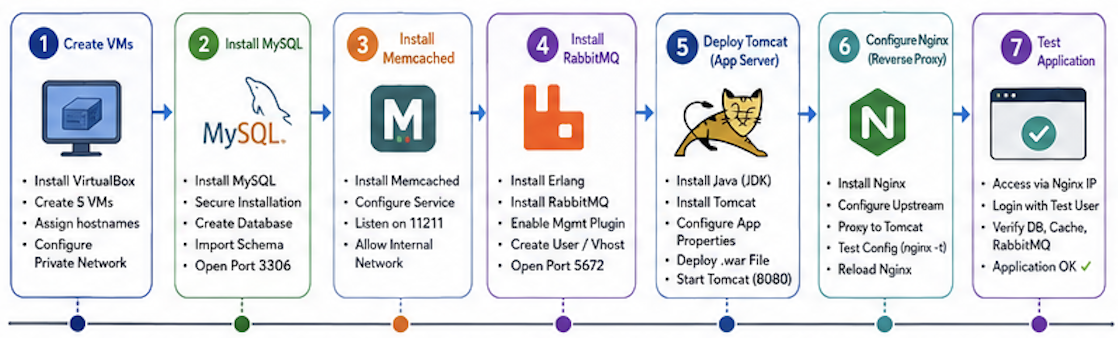
Phase 1 — Manual Multi-VM Provisioning
To gain a deeper understanding of enterprise infrastructure, I first built the entire environment manually.
Each service was deployed on its own Linux Virtual Machine.
Step 1 — Creating Virtual Machines
Using VirtualBox and Vagrant, I created five independent virtual machines connected through a private network.
Each VM received:
- Static IP address
- Hostname
- Dedicated resources
- Internal networking
This simulated a production-like environment.
Step 2 — Configuring the Database Server
The database server was configured first because every other component depends on it.
Tasks performed included:
- Installing MariaDB/MySQL
- Starting the database service
- Running
mysql_secure_installation - Creating application databases
- Importing SQL schema
- Configuring remote access
- Opening port 3306
Once complete, the application server could establish secure database connections.
Step 3 — Configuring Memcached
Next, a dedicated caching server was provisioned.
Configuration involved:
- Installing Memcached
- Enabling the service
- Listening on port 11211
- Allowing internal subnet communication
This cache layer reduced direct reads from the database.
Step 4 — Deploying RabbitMQ
RabbitMQ required Erlang runtime dependencies before installation.
The setup included:
- Installing Erlang
- Installing RabbitMQ
- Starting services
- Enabling the management plugin
- Creating application users
- Configuring virtual hosts
- Opening port 5672
The messaging system was now ready to process asynchronous tasks.
Step 5 — Deploying the Java Application
The application server hosted Apache Tomcat and the VProfile application.
Configuration steps included:
- Installing OpenJDK
- Installing Apache Tomcat
- Editing
application.properties - Setting MySQL credentials
- Configuring Memcached connection
- Configuring RabbitMQ connection
- Deploying the WAR file
- Starting Tomcat on 8080
This completed the business logic layer.
Step 6 — Configuring Nginx
Nginx became the public-facing server.
Tasks performed:
- Installing Nginx
- Creating upstream configuration
- Forwarding traffic to Tomcat
- Testing configuration
nginx -t
After validation, the service was reloaded.
Step 7 — End-to-End Testing
Finally, I validated the complete stack.
Testing included:
- Accessing the application through Nginx
- User authentication
- Database connectivity
- Cache verification
- RabbitMQ message processing
All services communicated successfully across the internal network.
Challenges Faced During Manual Provisioning
Manual deployment exposed several real-world challenges:
- Incorrect service startup order
- Network connectivity issues
- Firewall configuration
- Hostname resolution
- Database authentication problems
- Configuration mismatches
- Port conflicts
Although time-consuming, solving these problems greatly improved my understanding of Linux system administration and distributed applications.
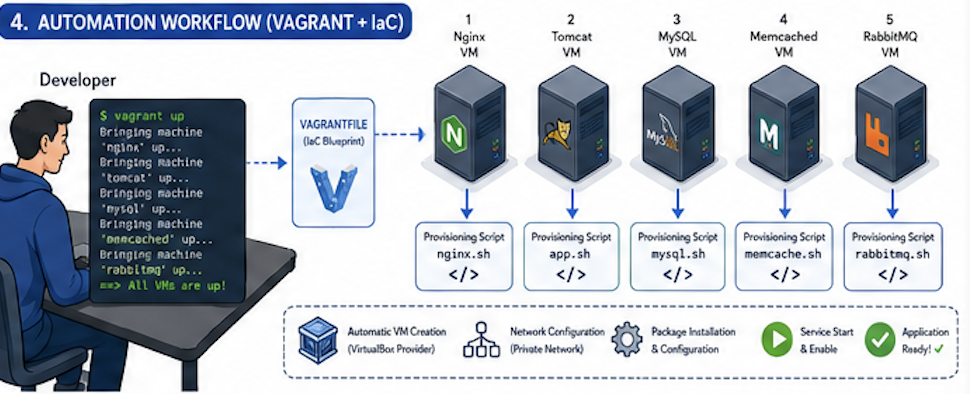
Phase 2 — Infrastructure Automation
After successfully completing manual deployment, I automated the entire infrastructure.
Instead of executing dozens of commands on every machine, the environment could now be reproduced using Infrastructure as Code (IaC).
Multi-Machine Vagrantfile
A single Vagrantfile defined:
- Hostnames
- Static IPs
- Memory allocation
- CPU allocation
- VM images
- Provisioning scripts
This became the blueprint for the infrastructure.
Automated Provisioning Scripts
Each server received its own shell script.
Examples:
mysql.sh
memcache.sh
rabbitmq.sh
app.sh
nginx.sh
Each script performed:
- Package installation
- Repository setup
- Configuration
- Service startup
- Security settings
- Application deployment
One Command Deployment
Instead of manually configuring five servers, the complete environment could now be deployed with a single command:
vagrant up
Vagrant automatically:
- Created every VM
- Configured networking
- Installed packages
- Executed provisioning scripts
- Started services
- Built the complete application stack
Within minutes, the infrastructure was fully operational.
Manual vs Automated Provisioning
| Manual Provisioning | Automated Provisioning |
|---|---|
| Time-consuming | Fast |
| Error-prone | Consistent |
| Difficult to reproduce | Fully reproducible |
| Many manual commands | Single command deployment |
| Harder maintenance | Easy maintenance |
| Learning-focused | Production-ready |
Key Engineering Learnings
Service Dependencies Matter
Infrastructure components must start in the correct sequence.
The proper order is:
- Database
- Cache
- Message Broker
- Application Server
- Reverse Proxy
Incorrect ordering often leads to connection failures.
Network Isolation Improves Security
Sensitive services like MySQL and Memcached should never be publicly exposed.
Restricting them to private networks significantly strengthens the security posture of the infrastructure.
Infrastructure as Code Changes Everything
Automating infrastructure provides several major advantages:
- Faster deployments
- Fewer configuration mistakes
- Consistent environments
- Easier collaboration
- Version-controlled infrastructure
- Rapid disaster recovery
This philosophy lies at the heart of modern DevOps.
Skills Gained
Through this project, I strengthened my understanding of:
- DevOps Fundamentals
- Infrastructure as Code
- Linux Administration
- Virtualization
- Vagrant
- VirtualBox
- Apache Tomcat
- Nginx
- MySQL
- Memcached
- RabbitMQ
- Shell Scripting
- Networking
- Reverse Proxy Configuration
- Service Orchestration
Final Thoughts
This project was much more than simply deploying an application—it was an exercise in understanding how modern production environments are designed.
Building the infrastructure manually gave me valuable insight into networking, service dependencies, configuration management, and troubleshooting. Automating the same deployment with Vagrant demonstrated the power of Infrastructure as Code, where complex environments become reproducible, scalable, and maintainable.
As organizations increasingly adopt DevOps practices, the ability to automate infrastructure is no longer optional—it is an essential engineering skill. This hands-on experience provided a strong foundation for working with larger automation tools such as Ansible, Docker, Kubernetes, and cloud platforms like AWS, where the same DevOps principles apply at an even greater scale.
“First understand the infrastructure manually. Then automate it. That’s where real DevOps begins.”
Image Best Practices
| Rule | Why |
|---|---|
| Keep images under 500KB | Fast loading on mobile |
Use .jpg for photos |
Smaller file size |
Use .png for diagrams/screenshots |
Crisp text and lines |
| Name files descriptively | federated-learning-diagram.png not IMG_1234.png |
| Resize to max 1200px wide | Larger images waste bandwidth |
[!TIP] Quick resize on Mac: Open image in Preview → Tools → Adjust Size → Set width to 1200px → Save.
